My entire life has been a short nail struggle, complete with peeling enamel, breaks, and thin nails. Around April and May 2017 I noticed that my nails were growing and were not breaking as much. The only thing that changed about my life routine was that I started taking women’s daily vitamins and was using wet n wild’s The Saving Base base coat over the few months prior. I decided that I wanted to maintain the health of my nails and to learn how to do a manicure that looks great and lasts. Through research and my own experience I have developed a nail care routine paired with a basic manicure. I can say that I have had long nails for almost a year now that rarely break, but keep growing like weeds. Also, my nail polish never chips and hardly cracks. My manicures are even work proof, lasting through jobs that are tough on your hands! Remember, I am not a professional. Everything I know is from internet research or my own life experience. This includes helpful pictures, but it is mostly detailed explanation.
I do this full nail care routine once a week. Sundays work best for me and I do my nails right before going to bed, which gives them a proper chance to dry without worrying about smudging or washing your hands. The top coat that I use dries super fast, so I never have creases in my nail polish from my bed sheets.
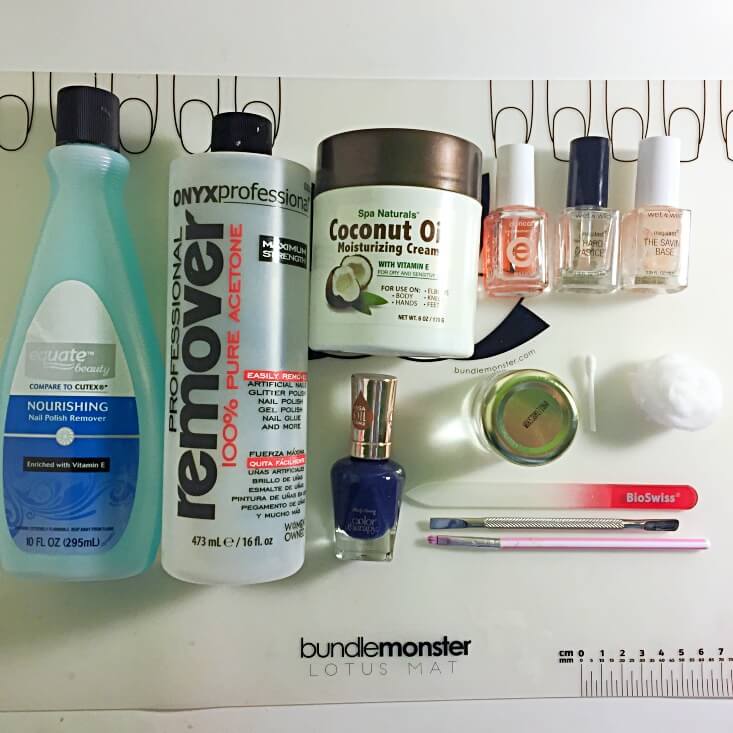
Nail Care Routine Supplies
- Nail polish remover
- Cotton balls
- Pure acetone
- Cotton swab
- Tiny brush
- Glass/crystal nail file
- Cuticle pusher
- Hand cream
- Top coat
- Base Coat
- Cuticle Oil
- Nail polish
Optional Supplies
- Something to protect your working surface. I use the Lotus Mat from Maniology. You can use a paper towel, piece of paper, etc. Beware of using any old silicone placemat because you cannot be sure if it can stand up to acetone like the Lotus Mat can. Acetone can melt man-made materials like plastic.
- Glass jar for storing and using acetone. You could get a glass jar at a craft store or dollar store, or even around your house. Remember that acetone can eat through plastic, so only use glass. If you are unable to use a jar, you can pour your acetone into the cap of the bottle. Note that acetone evaporates quickly, so you will need to cover the opening of the bottle while using the cap. You will also need to empty the used acetone out of the cap each time so that you do not pour the used acetone into your fresh bottle. The benefit of a glass jar is that you can use that portion of acetone over and over again until it becomes too dirty. You do not want to dump acetone down the drain or into a trashcan. Allow it to evaporate or absorb all of it with a cotton ball, then dispose of the cotton ball.
Step 1: Remove nail polish
The first step in my nail care routine is to remove any nail polish from your nails. You can use any nail polish remover that you have. I usually use Equate’s remover with a cotton ball. There are a variety of removers on the market. I really enjoy ones that come in a pot with a sponge. When using a cotton ball, saturate it really well and press the cotton ball onto your nails for a few seconds to break through the polish. When your cotton ball gets fairly dirty you will notice that it becomes harder to remove your nail polish. Throw away the cotton ball and get a fresh one. It is best to use a standard nail polish remover than pure acetone to remove all of your nail polish because acetone is very drying to the skin.
 |
| Nail polish remover and cotton ball |
Step 2: File nails
The next piece of information is critical to the health of your nails. Standard emery boards actually create small tears in your nails, which weakens them and causes breaks and chips. Under no circumstance should you file your natural nails with them! If you absolutely need to use one, only file in one direction to minimize tears. Emery boards should only be used on fake nails. Also, nail clippers are just as bad as emery boards. I say throw them all away to avoid the temptation of using them.
You should only file your nails with glass or crystal nail files because they do not create tears, thus no breaks! They have other benefits as well. The rough filing surface is engraved in the glass, so they do not wear out while being easy to clean. Finally, you can file your nails in any direction without problem! Now, you are probably wondering how do you actually trim your nails if I have banned nail clippers and emery boards. The honest answer is, you do not. The only recommend way to shorten your nails is to file with a glass nail file. Yes, this takes a lot of time and patience. If you are dedicated to your nails, you will have to suck it up and take the time. I recommend to do a little bit of filing every week to keep up with it, making it less of a daunting task.
 |
| Glass/crystal nail file |
 |
| Filing nails with glass nail file |
Step 3: Push back cuticles
When you push your cuticles back you are removing the skin that grows over top of your nail. This helps your nail polish to adhere to the nail and last all week. There are a variety of cuticle pushers out there. I use a metal one that you can get at a beauty supply store. If you are a beginner with cuticle pushers, I recommend an orange wood stick or silicone tip cuticle pusher until you become experienced. You can easily gouge or cause damage to your nails with a metal cuticle pusher if you are not experienced. You can find a variety of cuticle pushers at your local drugstore. I push my cuticles all the way around my nails, not just at the base of my nails. I have provided an image below for reference.
There are also products that you can get in your local drugstore that soften your cuticles to make pushing and removing them easier. I do not own or use any of those products, but you may want to consider adding them to your nail care routine if you have particularly stubborn cuticles.
 |
| Different types of cuticle pushers |
 |
| Pushing cuticles back with metal cuticle pusher |
Step 4: Cleanse and dehydrate
The next step in my nail care routine is to dip a cotton swab into acetone and rub the swab over each nail. This will ensure that your nails are completely cleansed and free of any oil and debris. Acetone also dehydrates your nails. Having moisture in your nails is actually bad for your nail polish and will aid it in chipping and cracking. Be sure to run the cotton swab under your nails as well. I actually cut my cotton swabs in half because I only need one end per week. I will never run out of swabs! Do note that you can buy an actual dehydrator in a beauty supply store. It looks just like clear nail polish, but dehydrates like acetone. Since acetone works just as good and is needed elsewhere in my nail care routine, I not see the point of purchasing a nail dehydrator.
 |
| Jar of acetone and cotton swab |
 |
| Dehydrating nails with acetone |
Step 5: Apply base coat
Base coat helps your nail polish stick to your nails and to last better. Be sure to apply one coat in your nail care routine and to allow it to dry before applying nail polish. I recommend The Saving Base by wet n wild because it contains plenty of awesome ingredients that are good for your nails, and dries in just a few minutes. I also think it actually does it’s job, unlike other base coats that I have used.
 |
| wet n wild megalast The Saving Base base coat |
Update 4/19/20
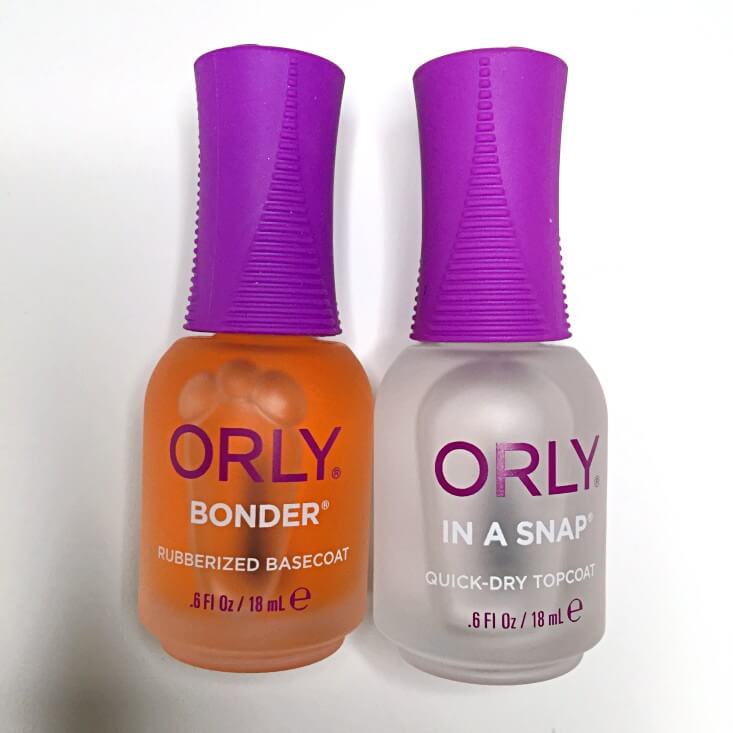
Both the top coat and base coat recommended in this post have been discontinued. After undergoing testing, I do approve of Orly’s Bonder Rubberized Basecoat and their In a Snap Quick-Dry Top Coat. Both of these are suitable replacements to the wet n wild products, and they embody all of the qualities that I look for and mention with the wet n wild versions.
Step 6: Apply nail polish
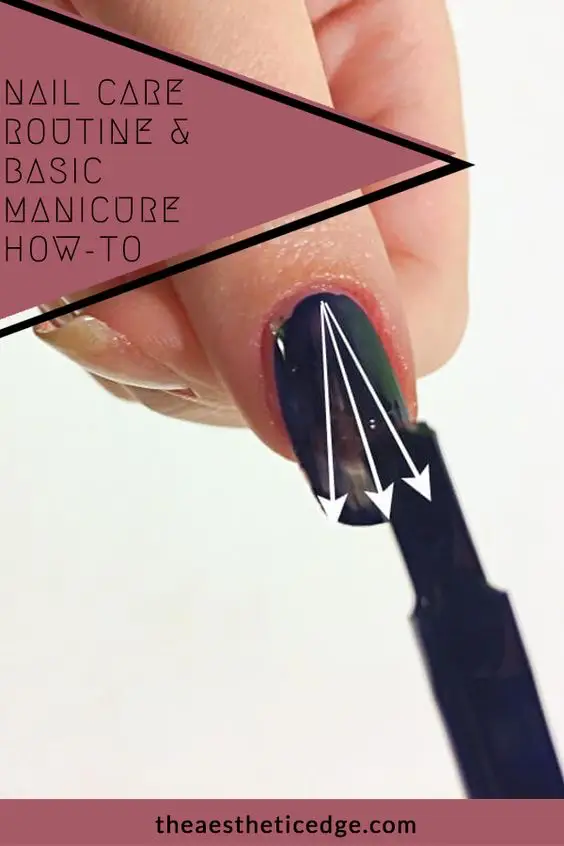
Before applying nail polish, rub the brush along the inside top of the bottle to remove excess nail polish. It is hard to explain just how much to leave on the brush, but you will figure it out with trial and error. The main thing here is that applying a layer that is too thick will take ages to dry. Always apply your nail polish in three strokes to get the best coverage. I have included some helpful diagrams below. Start in the middle of your nail at the base and make one swipe towards the front. Next, start in the middle again, but make a swipe diagonally to the left side of the nail. Finally, start in the middle once again and make a diagonal swipe toward the right side of the nail. If you get some on your skin, do not worry. We will do clean up later.
The next nail care routine step is highly important in having your manicure last. You want to tip or cap your nail after EVERY coat of nail polish, including EVERY coat of base coat and top coat. To tip your nails, bring the brush UNDER your nail tip and do one swipe from left to right. If you turn your nail over you will see a line of nail polish under your nail. You can also turn your nail up towards your face to see the edge is also painted. This actually is a major key in helping to prevent chips! Allow your first coat of nail polish to dry, then apply a second. Usually only two coats are necessary.
 |
| Painting a layer of nail polish onto a nail |
 |
| Capping nail tips with nail polish |
 |
| Underside of nail tip capped with nail polish |
Step 7: Clean up
After you have applied two coats of nail polish, but before applying top coat, go ahead and clean up the skin around your nails. It will be a lot easier to clean before applying top coat. Use a small brush and dip it into acetone. Tap the brush against the inside of the container to remove the excess acetone. Simply swipe the brush over the nail polish on your skin to remove it. Be sure to dip your brush back into the acetone often to keep it clean. Note that acetone really dries out your skin, but we will fix this later. I am using an old, small nail brush as a clean up brush. If you do not have one, a really great brush to use is elf’s $1 concealer brush! You can find it in most drugstores that carry elf, and on their website. Eventually the acetone will ruin your brush, so you might as well use a $1 brush.
The final step of clean up from my nail care routine is to remove the nail polish in your cuticle area. I have included a diagram below. Essentially, you want to focus on almost making a crescent shape at the base of the nail, exposing your nail. This is important for step 8.
It is important that you use pure acetone to clean your skin. Regular nail polish remover is not potent enough, which makes the task take much longer than necessary.
 |
| Acetone and brushes for nail polish clean up |
 |
| Removing nail polish from cuticle area with acetone |
 |
| Removing nail polish from skin with acetone |
Step 8: Top coat
The next step in my nail care routine is to apply top coat to your nails. My secret is applying two coats. Yes, you will burn through your top coat fast, but it really helps with making your manicure last all week. I like wet n wild’s Hard as Ice because it dries fast and is super shiny. I honestly believe that it works just as great as Seche Vite, but without the harmful chemicals! To apply the top coat, start at the base of your nail where you removed the nail polish around your cuticle area. This is creating a seal between your nail and the nail polish, which helps with longevity.
 |
| wet n wild megalast Hard As Ice top coat |
Step 9: Oil up your cuticles
The final step in my nail care routine is to oil your cuticles and to apply hand cream. Cuticle oil is important for two reasons. One, it keeps the skin around your nails moisturized, which helps your nail polish last. Two, it supplies important nutrients to your nails to keep them healthy and strong, which prevents breaks. I apply cuticle oil not just at the base of my nail, but all the way around. I have included a diagram below. To avoid making your hands feel like grease balls, remove the excess oil from the brush the same way that you remove excess nail polish at the top inside of the bottle. Apply the oil to five fingers before ever dipping the brush back into the bottle. Dip the brush in again, remove excess, and then do the other 5 fingers. Repeat these steps again, but this time apply the oil UNDER your nails, in between your nails and your skin. This will help your nails flex in dangerous situations where your nail would otherwise break!
You can use any cuticle oil that you prefer. There are a plethora on the market today. Right now I use essie’s Apricot Cuticle Oil simply because I have it on hand, but I think it performs fine.
You will then want to apply your favorite hand cream to your hands and nails. I use whatever I have on hand. Remember that moisture under your nail polish is bad for the polish, which is why we dehydrate. But, keeping the skin around your nails moisturized with oil and cream is good for your nail polish!
 |
| essie Apricot Cuticle Oil |
 |
| Where to apply cuticle oil |
 |
| Applying cuticle oil between the nails and skin |
 |
| Finished basic manicure |
Daily & Weekly Care
There are a few things that you want to do daily to keep up with your nail care routine that ensures the strength of your nails and that avoids chips and cracks in your polish. Every night before bed I re-apply cuticle oil using the same steps outlined in step 9. I then apply hand cream. By doing this before bed I know that I am giving my skin adequate time to absorb everything because I will not be washing my hands for some time. Finally, I check the underside and tips of my nails to see if any nail polish has worn off. If so, I apply nail polish to those areas. I find that keeping your nails tipped prevents your manicure from chipping!
I also “top up” on my top coat on Wednesday nights. I do Wednesday because it is about halfway through the week. What I mean by “top up” is that I apply one coat of top coat, and cap the tips of my nails. This also helps prevent chips, and revitalizes the shine of your nail polish.
 |
| Caring for nails during the week with hand lotion and cuticle oil |
Other Tips
There are other things that you can do in conjunction with this nail care routine to avoid breaking your nails or chipping your manicure. First and foremost, be mindful when doing things that are dangerous to your nails. For example, if you are opening a can of soda, do it carefully or use an object to lift the ring up. Avoid motions such as picking/peeling a sticker off of an object. While doing dishes, cleaning, or doing tasks that are hard on your nails, wear gloves. Remember that after showering your nails are in a gentle state and can break easier, so take life carefully until they dry out. The best way to keep your nails hard and strong while avoiding breaks is to keep your nails painted at ALL TIMES! I have stopped using hardeners and strengtheners because after time they make your nails so hard that they become brittle and break more.
This concludes my nail care routine and how to do a basic, one color manicure. If you have made it to the end, I congratulate you. Each of these steps take time and dedication. If you really care about your nails, you truly do need to put the effort in. If you decide to use my routine and start seeing positive results for yourself, please share in the comments. This post is a significant nail care resource. You should definitely bookmark it for your reference, and share it with friends and family who struggle with their nails. Until next time, continue to let your true beauty shine.


6 Responses
They seem to have discontinued Megalast The Saving Base. Any other suggestions for a base coat?
Yes they did, including Hard As Ice top coat 🙁 and I stocked up on them. I’m currently loving the Formula X base coat, however, that’s discontinued too. I recently picked up Orly Color Care Polish Bond, but I have not yet tried it, and I think EVEN THAT has been discontinued. Ugh. I will say that I really like Orly’s In a Snap Quick Dry Top Coat, which can replace Megalast Hard As Ice. I’ll go out on a limb here and say try Orly Bonder (I have never tried it) to replace Megalast The Saving Base. I can totally buy it, try it, and let you know what I think, if you will find that helpful!
That would be great. I just bought some Formula X base coat that I like as well, only to find out as you did, that’s discontinued. What’s the deal lately with the nail product discontinuations? Nail polish seems to be more popular than ever but they keep discontinuing all the various brand lines. I will tell you a base coat not to try. I have not at all been impressed by Essie base coat. Honestly I think they made my nails worse than ever.
It seems like every base coat/top coat that I really like is already discontinued. So frustrating. Thank you for the tip with Essie! I will avoid that one. I do like Essie’s Apricot Cuticle Oil. I will update you on Orly Bonder so stay tuned.
Hi, Pamela! I have been testing the Orly Bonder Rubberized Basecoat for five weeks now. I declare that it is a suitable replacement to wet n wild’s The Saving Base, and I have updated this post to reflect that. It does not harm my nail polish in any way, and my manicure performs as expected. Just wanted to follow-up with you! P.S. I also added the Orly In a Snap Quick-Dry Top Coat to this post as well!
I like that you talked discussed how to take care of your nails and how to do it yourself, this is a brief introduction to the world of cosmetology focusing on nail care. This is especially good for me since my daughter has been talking about the career path that she wants when she grows up, I can tell her stories about this and motivate her to do what she loves. Thanks to this article, I will surely tell her about this and I will surely inquire at a cosmetology school for more information about a course about cosmetology.